
Findmypast (FMP) software engineering practises and operational practices have changed considerably over the last few years. We’ve moved from a “classic” monolithic web service, where deployments to production were applied possibly weeks after the end of a sprint, to a microservices approach where we have continuous deployment to production and the majority of the FMP service is managed by Kubernetes.
The third blog post detailed how we migrated to deploying our production services into Kubernetes. This fourth blog post details how we configured our production Kubernetes environment for high availability.
The Journey to High Availability Kubernetes
For a few months, everything went well with the Kubernetes cluster. Our automation helped us upgrade Kubernetes on production a number of times without incident, until - of course - we had an incident with the Kubernetes master control node. A reboot of the control node failed to start the server correctly - the root disc was marked as read-only. After 10 mins or so, the worker nodes started to complain that they couldn’t talk to the API server and services began to fail.
The outage didn’t last too long - 20 mins or so - but once service was restored our attention turned to avoiding this situation in the future. Clearly, we needed high availability in case the master node threw more issues at us.
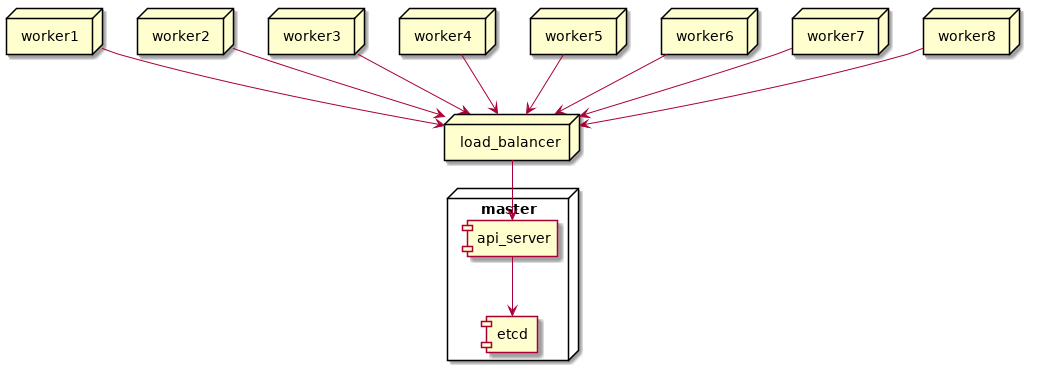
At the time, our Kubernetes cluster looked like this, One master control plane node with one API server and the etcd backend database held on the master with 8 worker nodes:

We have a few single points of failure here:
- The master node itself could become unavailable, killing both the api server and the cluster data store saved in etcd.
- The api server pod could become unavailable.
- The etcd pod could become unavailable.
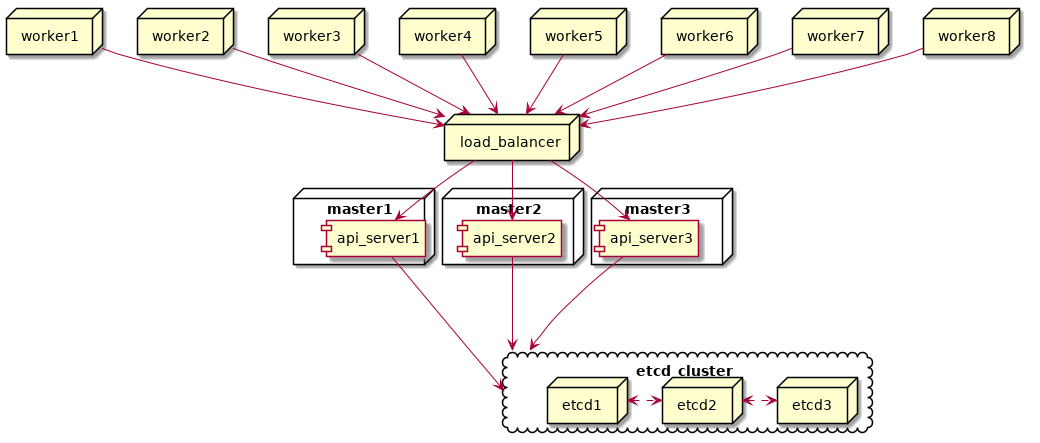
To mitigate these SPFs, our end goal is to update the cluster to an external etcd toplogy with three control plane nodes and external etcd cluster:
 “”)
“”)
While upgrading the cluster, we wanted zero (or near zero) downtime for the website while the upgrade was taking place.
To mitigate the blast radius of the changes, we took a phased approach to upgrading the cluster. Each phase could be completed in isolation and easily rolled back if anything went horribly wrong.
The upgrade phases were:
- Add a load balancer between the worker nodes and master control plane.
- Extract
etcddatabase to a separate high-availability cluster. - Add new control plane nodes.
We took a rather cautious approach to the planning and execution of the phases:
- For each phase, we identified and practised the steps to take to complete the phase. The manual steps taken were documented and members of the team reviewed the documentation by following the steps. Unclear guidance was improved.
- Once we had a reproducible set of (manual) steps we could take to upgrade the cluster to HA, we automated as much as possible (using Ansible scripts) to reduce the number of human mistakes. A new guide was created - the playbook for each phase - that described step by step what scripts to run and what manual steps to take to complete the phase.
- Again, that playbook was reviewed by the team by following the steps in the playbook, updating unclear instructions where necessary.
When we’re ready to perform the upgrade, we had a playbook for each phase and each team member had completed the update to HA on our playground Kubernetes cluster at least once. We were ready to go!
Phase 1: Adding a load balancer
This, on the face of it seemed like an easy thing to achieve. We already have an NGINX server in place, so adding new upstreams that proxied onto the Kubernetes master control plane nodes to the NGINX configuration was straightforward.
However, the Kubernetes API server refused to accept requests proxied via NGINX. We need to create new API server certificates that included the IP address of the NGINX server in the Subject Alternate Name (SAN).
Once they were updated, we copied the new certificates to the worker nodes and updated the kubelet configuration on each worker node to use the NGINX load balancer as the API endpoint.
Finally, because our cluster is spun up using kubeadm, we needed to update the controlPlaneEndpoint property in the kubeadm configuration to ensure that future Kubernetes upgrades would find the correct API server endpoint.
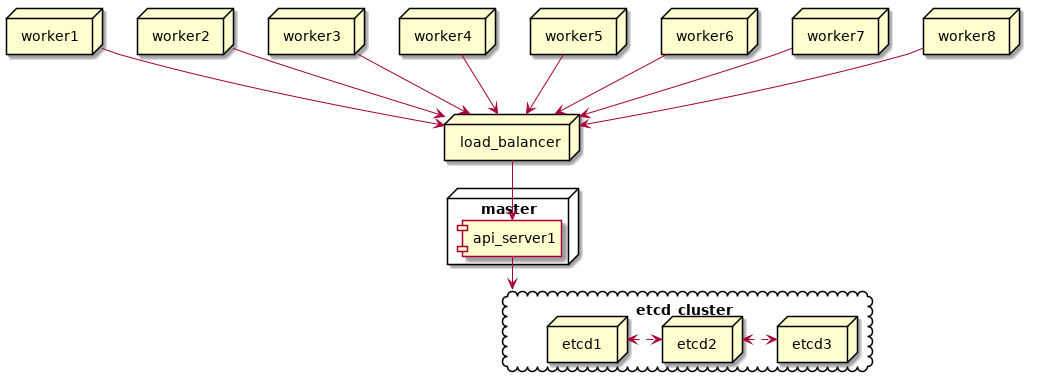
At this point, our setup looked like this. It’s a bit odd with the load balancer pointing at one control plane node, but that’ll change when we add more control planes:
 “”)
“”)
Phase 2: Creating an external etcd cluster
Next phase was moving the etcd database from the existing control plane node onto an external etcd cluster with three nodes. The plan was to add three etcd nodes to the existing etcd and, once the replication magic was completed, remove the etcd instance from the control plane node, leaving us with an three node etcd cluster external to the Kubernetes cluster.
The general steps to achieve this were:
- We provisioned three VM’s with
etcdinstalled on each of the VMs. - Create new SSL certificates for
etcd- new peer and server certificates were created. The certificates were signed with kubernetes CA certificate. - Each host was added into the cluster one host at a time. To do that:
-
On the
etcdhost, stop theetcdservice and remove the existing configuration folder. (Typically found in/var/lib/etcdfolder.) -
Adding a host was a call to
etcdctlfrom within theetcdpod running on the Kubernetes cluster. We opened a shell into the pod and issued the command to add a new member:
$ ETCDCTL_API=3 etcdctl --cacert /etc/kubernetes/pki/etcd/ca.crt --cert /etc/kubernetes/pki/etcd/peer.crt --key /etc/kubernetes/pki/etcd/peer.key member add "fh1-k8s-etcd01" --peer-urls="https://172.21.14.91:2380" Member 4ea98ab081f843d9 added to cluster 6090d9ccc522c5c4- On the
etcdhost, start theetcdservice:systemctl start etcd. That should quickly start up and join the cluster.
-
- Once all hosts were added we have a cluster with four
etcdinstances. Final step was to removeetcdfrom the control plane node:-
The API server on the control plane needed to be updated to know about the new
etcdhosts. That information is saved in/etc/kubernetes/manifests/kube-apiserver.yamlon the control plane host. The-etcd-serversproperty needed to be changed to point to three newetcdhosts.Editing this file will automatically restart the API server, so we made sure that the cluster still behaved as expected after this change.
-
On any of the new
etcdhosts, we usedetcdctlto remove theetcdinstance associated with the control plane node. First, we needed to get the instance ID:root@fh1-k8s-etcdt01$ ETCDCTL_API=3 etcdctl --cacert /etc/etcd/certs/ca.crt --cert /etc/etcd/certs/peer.crt --key /etc/etcd/certs/peer.key -w table --endpoints=fh1-kubet01:2379,fh1-k8s-etcdt01.dun.fh:2379,fh1-k8s-etcdt02.dun.fh:2379,fh1-k8s-etcdt03.dun.fh:2379 endpoint status +-----------------------------+------------------+---------+---------+-----------+-----------+------------+ | ENDPOINT | ID | VERSION | DB SIZE | IS LEADER | RAFT TERM | RAFT INDEX | +-----------------------------+------------------+---------+---------+-----------+-----------+------------+ | fh1-kubet01:2379 | bdf1c0c0d197886d | 3.2.24 | 5.5 MB | true | 28 | 134209 | | fh1-k8s-etcdt01.dun.fh:2379 | 61325c8d446f52f3 | 3.3.10 | 5.1 MB | false | 28 | 134209 | | fh1-k8s-etcdt02.dun.fh:2379 | d365bb78153d1e05 | 3.3.10 | 5.5 MB | false | 28 | 134209 | | fh1-k8s-etcdt03.dun.fh:2379 | 40544edaa48f23dc | 3.3.10 | 5.5 MB | false | 28 | 134209 | +-----------------------------+------------------+---------+---------+-----------+-----------+------------+In the example above,
fh1-kubet01:2379is the control plane node. To remove that from the cluster:root@fh1-k8s-etcdt01$ ETCDCTL_API=3 etcdctl --cacert /etc/etcd/certs/ca.crt --cert /etc/etcd/certs/peer.crt --key /etc/etcd/certs/peer.key member remove bdf1c0c0d197886dThat removes the control plane
etcdinstance from theetcdcluster. Finally, we remove theetcdpod from the control plane node:root@fh1-kubet01$ cd /etc/kubernetes/manifests root@fh1-kubet01$ rm etcd.yamlKubeletrunning on the control plane node will pick up that the manifest is missing and remove theetcdresources.
-
Problems found along the way
Of course, whe investigating and creating the playbooks, the above wasn’t quite as straight forward. etcd does appear to have some quirks that make it slightly harder to get the configuration setup correctly.
Configuring etcd cluster state
Configuration of the etcd hosts is quirky - if we don’t get that right then etcd will fail to start and log messages about the cluster state being inconsistent. This all boiled down to the ectd ETCD_INITIAL_CLUSTER configuration property. Initially, we configured that property to be the addresses of all the etcd hosts. E.g.:
ETCD_INITIAL_CLUSTER="fh1-kubet01=https://172.21.16.61:2380,fh1-k8s-etcd01.dun.fh=https://172.21.14.91:2380,fh1-k8s-etcd02.dun.fh=https://172.21.14.92:2380,fh1-k8s-etcd03.dun.fh=https://172.21.14.93:2380"
That, however, was wrong. When we tried to add fh1-k8s-etcd01 to the etcd cluster, the only members in the cluster were fh1-kubet01 and fh1-k8s-etc01. The other etcd hosts were not members. To get the etcd instance to join the cluster correctly, we needed to provide different values for the ETCD_INITIAL_CLUSTER, depending on the hosts.
So, for fh1-k8s-ect01, it would be:
ETCD_INITIAL_CLUSTER="fh1-kubet01=https://172.21.16.61:2380,fh1-k8s-etcd01.dun.fh=https://172.21.14.91:2380"
While for fh1-k8s-etcd02 it would be:
ETCD_INITIAL_CLUSTER="fh1-kubet01=https://172.21.16.61:2380,fh1-k8s-etcd01.dun.fh=https://172.21.14.91:2380,fh1-k8s-etcd02.dun.fh=https://172.21.14.92:2380"
The ETCD_INITIAL_CLUSTER value for a etcd host had to match the members added to the cluster at that time.
First etcd node joining the cluster
We also found an issue when we added the first etcd node into the cluster. The etcd pod on the K8s cluster entered a crash loop backoff state and kept restarting. Because of that, the etcd node wouldn’t start up (because the pod had crashed). We could get the etcd service started up and added to the cluster, provided we started the service when the pod was running between crashes! If we were pretty quick about adding the new member to the cluster and then starting up the etcd service on the host was fine. If we were slow (> 15 secs perhaps) then the pod went into a crash loop.
Failing to join etcd instance to cluster - part 1
Joining the fh1-k8s-etcd01 node initially failed. etcd won’t start on the new host and the log entry was:
-- Logs begin at Fri 2019-04-26 08:03:04 UTC, end at Tue 2019-04-30 07:17:49 UTC. --
...
Apr 30 07:04:06 fh1-k8s-etcd01 etcd[195108]: could not get cluster response from https://172.21.14.51:2380: Get https://172.21.14.51:2380/members: dial tcp 172.21.14.51:2380: connect: connection refused
Apr 30 07:04:06 fh1-k8s-etcd01 etcd[195108]: cannot fetch cluster info from peer urls: could not retrieve cluster information from the given urls
Apr 30 07:04:06 fh1-k8s-etcd01 systemd[1]: etcd.service: Main process exited, code=exited, status=1/FAILURE
Apr 30 07:04:06 fh1-k8s-etcd01 systemd[1]: Failed to start Etcd Server.
It couldn’t connect to etcd on the master: Get https://172.21.14.51:2380/members: dial tcp 172.21.14.51:2380: connect: connection refused
The problem was that the etcd configuration for our Kubernetes production cluster is different than that on the playground cluster. Looking at the /etc/kubernetes/manifest/etcd.yaml on playground we get - among other things - these IP addresses configured when etcd starts up:
    - --advertise-client-urls=https://172.21.16.61:2379
    - --cert-file=/etc/kubernetes/pki/etcd/server.crt
    - --client-cert-auth=true
    - --data-dir=/var/lib/etcd
    - --initial-advertise-peer-urls=https://172.21.16.61:2380
    - --initial-cluster=fh1-kubet01=https://172.21.16.61:2380
    - --key-file=/etc/kubernetes/pki/etcd/server.key
    - --listen-client-urls=https://127.0.0.1:2379,https://172.21.16.61:2379
    - --listen-peer-urls=https://172.21.16.61:2380
    - --name=fh1-kubet01
Note that most of the IP addresses here are the host IP address. The same file on production
    - --advertise-client-urls=https://127.0.0.1:2379
    - --cert-file=/etc/kubernetes/pki/etcd/server.crt
    - --client-cert-auth=true
    - --data-dir=/var/lib/etcd
    - --initial-advertise-peer-urls=https://127.0.0.1:2380
    - --initial-cluster=fh1-flagship01=https://127.0.0.1:2380
    - --key-file=/etc/kubernetes/pki/etcd/server.key
    - --listen-client-urls=https://127.0.0.1:2379
    - --listen-peer-urls=https://127.0.0.1:2380
    - --name=fh1-flagship01
And the IPs here are all localhost. etcd on the control plane node isn’t listening on the host address, which is why the new etcd host failed to communicate with the existing etcd on the control plane.
We updated the Kubernetes etcd configuration on the control plane node to use the host IP address and tried again…
Failing to join etcd instance to cluster - part 2
Updating the 127.0.0.1 IP addresses to use the host address didn’t fix the problem. The etcd host still failed to connect through to etcd on the control plane node.
This time the log entry was:
error validating peerURLs {ClusterID:c9be114fc2da2776 Members:[&{ID:a874c87fd42044f RaftAttributes:{PeerURLs:[https://127.0.0.1:2380]} Attributes:{Name:fh1-flagship01 ClientURLs:[https://0.0.0.0:2379]}} &{ID:e64f069657cd588 RaftAttributes:{PeerURLs:[https://172.21.14.91:2380]} Attributes:{Name: ClientURLs:[]}}] RemovedMemberIDs:[]}: unmatched member while checking PeerURLs ("https://127.0.0.1:2380"(resolved from "https://127.0.0.1:2380") != "https://172.21.14.51:2380"(resolved from "https://172.21.14.51:2380"))
This took a while to diagnose. The problem was that etcd will use a stored version of the advertised peer URL, rather than use the IP specified in the configuration. When we changed the configuration from the 127.0.0.1 to the host IP, etcd was still picking up the stored 127.0.0.1 address for the peer URL. We could see that when we listed the members.
$ kubectl config use-context production-admin@kubernetes
Switched to context "production-admin@kubernetes".
$ kubectl exec -it -n kube-system etcd-fh1-flagship01 sh
/ # export ETCDCTL_API=3
/ # etcdctl --cacert /etc/kubernetes/pki/etcd/ca.crt --cert /etc/kubernetes/pki/etcd/peer.crt --key /etc/kubernetes/pki/etcd/peer.key member list -w table
+------------------+---------+-----------------------+---------------------------+---------------------------+
|        ID        | STATUS  |      NAME             |        PEER ADDRS         |      CLIENT ADDRS         |
+------------------+---------+-----------------------+---------------------------+---------------------------+
| ec22143f96f83c45 | started | fh1-flagship01        | https://127.0.0.1:2380    | https://127.0.0.1:2379    |
+------------------+---------+-----------------------+---------------------------+---------------------------+
The fix here was to tell etcd that the peer has a new URL. See https://coreos.com/etcd/docs/latest/op-guide/runtime-configuration.html#update-advertise-peer-urls for more information on this.
Once these quirks were ironed out, our Kubernetes production cluster looked like this:
 “”)
“”)
Phase 3 - Adding new control plane nodes
This wasn’t too difficult. The steps were:
- Provision two new virtual machines
- Copy certificates and configuration files from the existing control plane nodes to the two new nodes
- Issue the
kubeadmjoin command to add the new control plane nodes to the cluster. - Update the NGINX load balancer and add the two new control plane nodes to the Kubernetes upstream.
That was pretty much about it. At this point we had our final HA setup!
“”)
Summary
Our journey along the road to deploying our services to a high-availability Kubernetes cluster has been long, winding and rough in a number of places. But, IMHO, the journey has been worth it. Our experience with running Kubernetes has, on the whole, been positive.
- Our ability to auto-scale our services is nice. We can respond automatically to more demand on the web service.
- We’ve reduced the number of virtual machines running our web service down to manageable number.
- Kubernetes (and Prometheus) allows us to easily instrument how the cluster and the services are performing.
- Upgrades to the Production site and - on the whole - pretty painless. Both Istio and Kubernetes upgrades can be applied with little downtime.
- On the downside, Istio and distributed tracing has not been so successful. For tracing requests, each pod needs to have the Istio sidecar injected. However, we are finding a lot of routing configuration issues with the sidecar. Because of this we don’t use the sidecar in production, but we do have it enabled on our staging cluster where we are continuing to test the sidecar configuration.
I hope you also enjoyed the journey!